Cheap DIY fix for P203B and P205C
有關我的2015 VW Sharan的 SCR 系統故障問題, 在 DIY 修了P208E 這個 AdBlue injector 卡在關閉狀態的問題之後, SCR 系統的問題就剩下 P203B 和 P205C 這兩個故障碼。
從噴射閥卡住的問題來看,除非寫程式把SCR系統關閉, 不然時間久了, 還是可能會造成問題。而SCR 系統只要不故障,其實我是喜歡他的,相較於家裡面另一台沒有SCR 系統的車子, 這個系統可以讓排氣味道明顯的不明顯。
而他能夠降低NOx 的運作成本並不高, AdBlue在加油站一公升15.9元並不貴, 主要的顧慮還是來自系統故障的維修成本太高。
所以還是決定把這兩個問題解決掉。

P205C 這個問題是溫度sensor 故障,剛開始是信號不可信, 最後就直接對地短路了。故障的原因眾說紛紜,但因為Sensor是埋在AdBlue 桶內, 所以維修成本很高。
要解決這個問題要先回到這個溫度sensor的用途來看,AdBlue 在攝氏零下11 度的時候會結凍,所以如果環境溫度低於結凍溫度的話, 系統就要啟動同樣在桶內的加熱元件去加溫, 讓SCR 系統能夠正常運作。
像我們在台灣除非在冬季上到3000公尺以上的山區, 不然是沒有機會遇到這樣的溫度, 所以這套加熱系統其實根本沒有機會運作。

 |
| 10K NTC chart |
而根據網路資訊顯示,這個溫度Sensor 是個10K 歐姆的NTC 電阻,在電子材料行可以輕易取得,包含運費也不用100台幣。甚至可以直接用10K 歐姆的電阻取代NTC, 讓電腦一直讀取到攝氏25 度, 也可以讓系統正常運作。
所以這個問題就變成如何讓電腦讀取溫度Sensor 的線路讀到10K 歐姆。
從網路上搜尋到的AdBlue 桶子照片其實都不夠清楚到可以看出實體線路的走線,這樣就不好判斷該剪斷哪兩條線去把外接的NTC或是電阻接上, 所以還是得花時間去拆下來看。
要拆AdBlue 桶要先拆下後保險桿,然後才能把桶子拆下。
拆保險桿的過程可以在Youtube 上面找到, 簡單來說就是先打開行李箱尾門,從兩側蓋板用11mm 套桶把固定尾燈的塑膠螺絲鬆開, 就可以解開尾燈的線路 connector, 拆下兩邊尾燈。尾燈下有兩顆T30 螺絲固定保險桿。接著就用T25 起子把保險桿後面下方的螺絲都拆除, 後輪兩側輪弧內的擋板螺絲也需要拆下,左後輪的輪胎要拆掉比較好操作。保險桿和後葉子板之間有一個螺絲從下方往上鎖, 把保險桿固定在後葉子板上面。這些螺絲都拆掉之後就可以從兩側把保險桿掰開往後移出,在車體左後方保險桿內側有 Parking sensors 的線束接頭要拆開才能完全卸下。
保險桿卸下之後, 為了減低拆下AdBlue 桶子的難度, 我拿了小抽水Pump 把桶內殘餘的6公升AdBlue抽出來,不然如果滿桶有十多公斤重量, 拆開固定螺絲怕會墜落。
沒有保險桿和左後輪的遮擋, 就可以清楚看到要卸下桶子需要拆開的接頭, 包括車體左後方的兩個大線束接頭,靠近後輪的一個線束接頭以及AdBlue 的輸出管路接頭。
把這幾個接頭拆開之後, 整個桶子就靠側面兩個13mm 螺絲還有底部一個13mm 螺絲固定,拆開這三個螺絲之後, 就可以慢慢將桶子卸下, 加注口的週邊有一圈用來將車體內外隔開來的橡膠, 也會跟著脫落, 之後裝回要再仔細固定, 才不會讓外面塵土進入車內。
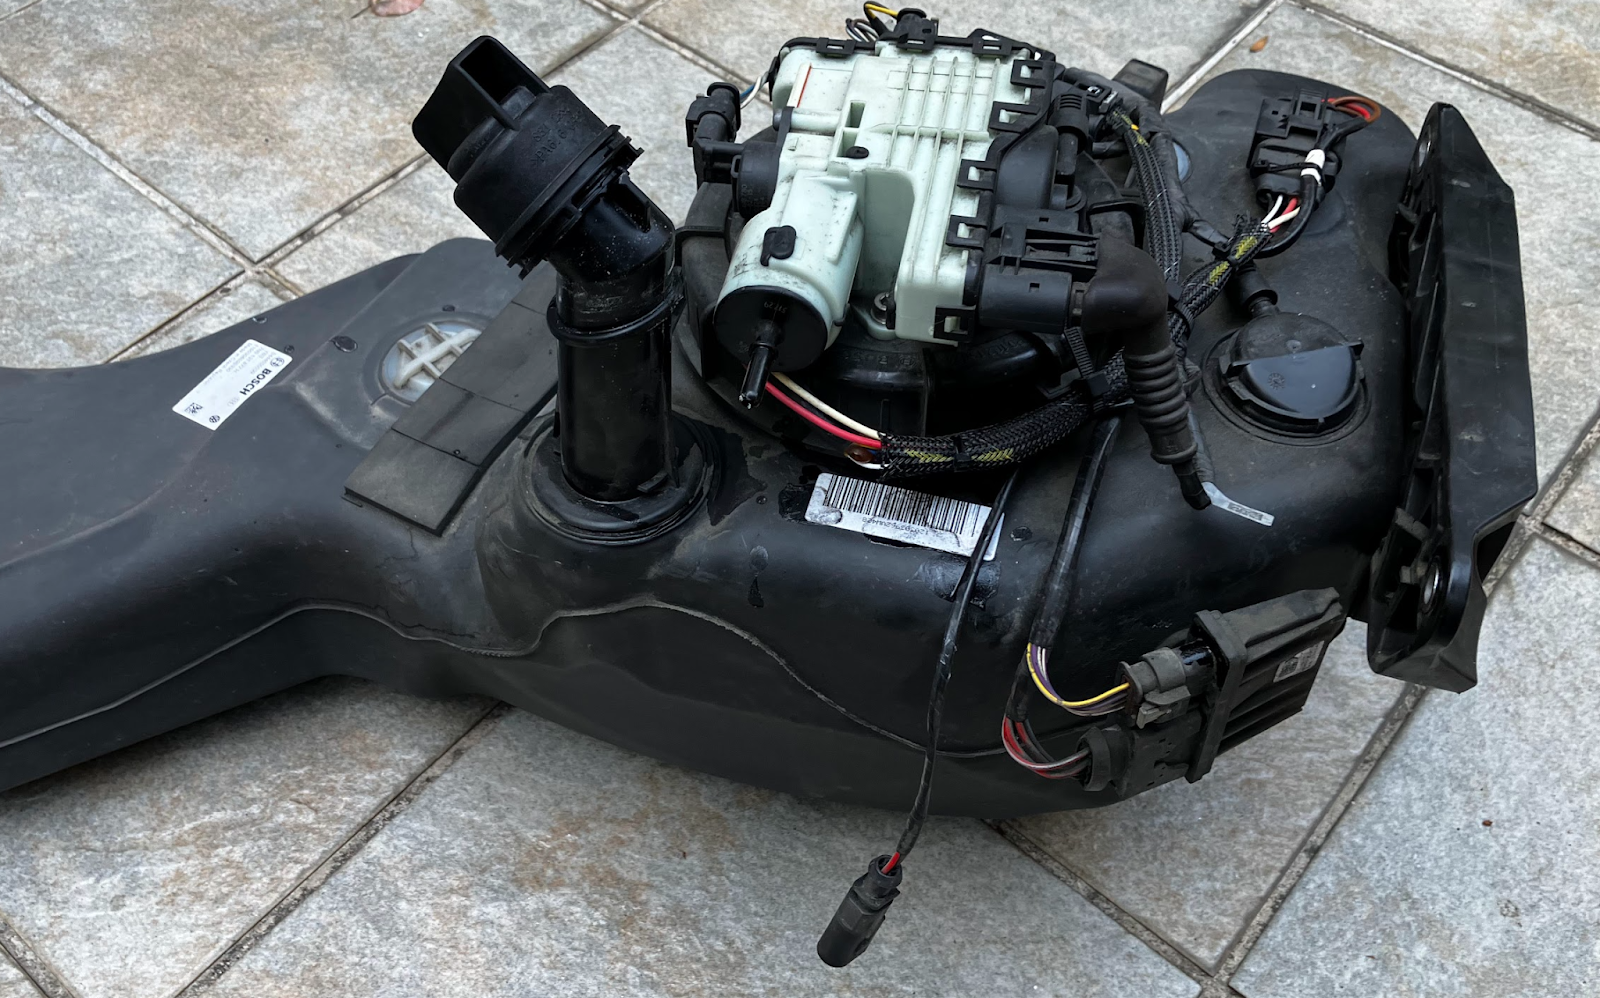
卸下AdBlue 桶子之後,就可以看到從 Pump 下方的蓋子伸出的線束, 其中包括溫度Sensor, 液位Sensor 以及 加熱元件。而溫度Sensor 的線路是黑白色的兩條,但是因為外面都有保護網套著, 再用束帶固定, 所以沒有拆下剪開來看, 的確不容易看到該剪哪一對線。
剪斷黑白線之後用電表量測桶內的Sensor, 的確是短路的狀態。所以就可以拿 10K 歐姆NTC 電阻分別焊接到黑白線, 然後用熱縮套管固定, 再套回原本的保護網用束帶固定。
這樣雖然量不到實際上AdBlue 桶內溶液的溫度, 但是也可以量測到桶子上方和車體之間的環境溫度, 如果真的有遇到低溫的環境, 加熱元件也還是能動作。
剪斷的Sensor 那一頭也用熱縮套管固定保護, 避免有任何液體從電線剪斷處滲入桶內。
既然已經把桶子拆下, 乾脆就再燒一桶6公升熱水到 65度,倒進桶內搖晃清洗, 把殘留的結晶都一併清洗。
接下來就是復原的工作, 把桶子裝回, 接回全部接頭, 裝回保險桿、 尾燈以及拆下的左後輪。再將事先準備的AdBlue 溶液15 公升加回桶內。
用檢測電腦把SCR 溶液的液位sensor 作重置的動作, 這時候就原本的故障碼就全部消除了。
整個SCR 系統就回復正常操作狀態, 之後就還是要再定期添加AdBlue 溶液。
其實在復原的過程中我有發現,如果只是要把溫度Sensor 外接, 讓溫度量測變成是環境溫度或是只是要加個電阻騙過系統, 不再使用加熱元件,是可以不用拆下桶子的,只要知道剪開那個線束的保護網和束帶, 其實應該有足夠的空間完成這個操作。
整個的P205C 故障修復就變成只有拆下左後輪和幾個螺絲就可以修復, 雖然不算完整回復原廠狀態, 但是功能是完全恢復的。
Regarding the SCR system failure issue with my 2015 VW Sharan, after DIY fixing the problem of the AdBlue injector being stuck in the closed position (error code P208E), the remaining issues in the SCR system are error codes P203B and P205C.
Based on the injector valve sticking issue, unless the SCR system is programmed to be turned off, there is still a possibility of causing problems over time.
In fact, I actually like the SCR system as long as it doesn't malfunction. Compared to another car at home that doesn't have an SCR system, this system makes the exhaust odor much less noticeable.
It doesn't cost much to operate the SCR system in terms of reducing NOx emissions. AdBlue is not expensive at the gas station, priced at NT$ 15.9 per liter. The main concern lies in the high maintenance cost associated with system failures.
Therefore, I have decided to resolve these two issues. The P205C problem is related to a temperature sensor malfunction, which initially had an unreliable signal and eventually shorted to ground. The cause of the failure varies, but due to the sensor being buried in the AdBlue tank, the maintenance cost is high.
To solve this problem, we need to understand the purpose of this temperature sensor. AdBlue freezes at -11 degrees Celsius, so if the ambient temperature is lower than the freezing point, the system needs to activate a heating element also located in the tank to warm it up, enabling the SCR system to function properly.
In Taiwan, unless we go to mountainous areas above 3000 meters in winter, we won't encounter such low temperatures. Therefore, this heating system doesn't actually have a chance to operate. According to information found online, this temperature sensor is a 10K ohm NTC resistor, which can be easily obtained from electronic material stores, including shipping, for less than 100 TWD. It is even possible to directly replace the NTC with a 10K ohm resistor, allowing the computer to constantly read a temperature of 25 degrees Celsius, which will enable the system to function normally.
So the problem now becomes how to make the computer read the temperature sensor circuit as 10K ohms.
The photos of the AdBlue tank found online are not clear enough to see the wiring of the physical circuit, making it difficult to determine which two wires and where to be cut and connect the external NTC or resistor to. Therefore, it will take some time to dismantle it.
To dismantle the AdBlue tank, you need to remove the rear bumper first and then remove the tank. The process of removing the bumper can be found on YouTube. In simple terms, open the trunk door, use an 11mm socket to loosen the plastic screws that secure the rear lights on both sides, and disconnect the rear light connectors to remove the lights. There are two T30 screws under the rear lights that secure the bumper. Then, use a T25 screwdriver to remove the screws at the bottom rear of the bumper, and also remove the screws on the inner fender covers on both sides of the rear wheels. It's better to remove the left rear tire for easier operation. There is a screw that locks from below between the bumper and the rear quarter panel, securing the bumper onto the rear quarter panel. After removing all these screws, you can pry the bumper open from both sides and move it backward. There is a wiring harness connector for parking sensors inside the left rear bumper that needs to be disconnected to completely remove it.
After removing the bumper, in order to facilitate the removal of the AdBlue tank, I used a small pump to extract the remaining 6 liters of AdBlue from the tank. Otherwise, if the tank is full, it weighs over ten kilograms, and I was afraid that it might fall when removing the securing screws.
Without the bumper and the cover on the left rear, you can clearly see the connectors that need to be disconnected in order to remove the tank, including the two large wire harness connectors on the left rear of the car body, a wire harness connector near the rear wheel, and the output pipe connector for AdBlue.
After disconnecting these connectors, the entire tank is secured by two 13mm screws on the side and one 13mm screw at the bottom. After removing these three screws, the tank can be slowly removed. There is a rubber seal of filler neck around the filling port that separates the inside and outside of the vehicle, and it will come off along with the tank. It needs to be carefully reinstalled to prevent dust from entering the interior.
After removing the AdBlue tank, you can see the wiring harness that extends from the bottom of the pump cover, including the temperature sensor, level sensor, and heating element. The temperature sensor's circuit consists of two black and white wires, but they are covered by a protective mesh and secured with zip ties, making it difficult to see which pair of wires to cut without dismantling them.
After cutting the black and white wires, I used a multimeter to measure the sensor inside the tank, and indeed it was short-circuited. So I soldered a 10K ohm NTC resistor to each of the black and white wires, then secured them with heat shrink tubing and put them back into the original protective mesh, securing them with zip ties.
This way, although the actual temperature of the AdBlue solution inside the tank cannot be measured, it is still possible to measure the ambient temperature between the tank and the vehicle body. If a low-temperature environment is encountered, the heating element will still function.
The cut end of the sensor should also be protected and secured with heat shrink tubing to prevent any liquid from entering the tank through the cut wires.
Since the tank has already been removed, it's a good idea to fill another 6 liters of hot water heated to 65 degrees Celsius into the tank and shake it to clean, removing any remaining crystals.
Next is the restoration work. Install the tank back, reconnect all the connectors, reassemble the bumper, rear lights, and the previously removed left rear wheel. Then, pour 15 liters of prepared AdBlue solution back into the tank.
Reset the level sensor of the SCR solution using a diagnostic computer, and all the previous fault codes will be cleared.
The entire SCR system will return to normal operation, but regular additions of AdBlue will still be necessary.
Actually, during the restoration process, I found that if the goal is only to connect an external temperature sensor to measure the ambient temperature or to add a resistor to deceive the system without using the heating element, it is possible to do so without removing the tank. As long as you know how to remove the protective mesh and zip ties from the wire harness, there should be enough space to perform this operation.
The repair process for the P205C fault code now only involves removing the left rear wheel and a few screws. Although it may not fully restore the original factory state, the functionality is completely restored.

留言
張貼留言